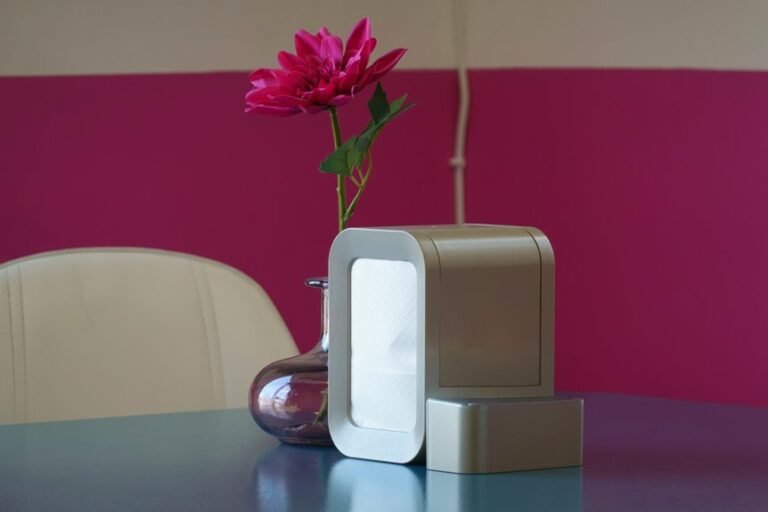
Deep cleaning a Dyson air purifier starts with turning it off, unplugging it, and letting it cool completely. After that, remove the cover, filters, and any water parts with care. Wipe the outside with a dry cloth and clean each part using Dyson’s deep-clean steps. A lot of problems start before cleaning begins, so a proper setup makes the whole job easier.
What You Need to Clean It Safely
Before you start, gather the exact materials and prep the purifier so you can clean it safely and without interruption: 150 grams of citric acid, cold water, and a dry cloth.
These deep clean supplies give you measured control and reduce contamination risk during maintenance. Use only safe cleaning materials so you protect internal components and keep the process consistent with Dyson care guidance.
Check the LCD screen or Dyson Link app for the deep clean alert before proceeding.
Then remove the water tank, evaporator, filter covers, and shrouds so every part is ready for solution preparation.
Fill the tank halfway with cold water first.
Keep the cloth nearby to wipe excess water from the cap and tank edges.
Once you prepare carefully, you work like the community of owners who maintain their machines correctly.
Turn Off and Unplug Your Dyson
Initially, power down your Dyson using the controls and confirm the unit has fully stopped before you handle any removable parts.
Next, unplug it directly from the wall outlet so you eliminate live power during disassembly and cleaning.
Then wait for the machine to cool completely, since internal components can retain heat after operation.
Power Down Safely
Although the LCD screen or Dyson Link app will alert you whenever a deep clean cycle is due, you should turn the purifier off and unplug it before removing any parts. This safe shutdown protects you from accidental fan movement, electrical exposure, and control errors while you prepare the machine for maintenance. It also helps preserve the purifier’s internal electronics during handling.
Press the power button and confirm the unit has fully stopped operating. Wait for airflow to cease, the display to go dark, and any moving components to settle. That pause supports proper power isolation and reduces the chance of disrupting sensors or internal assemblies. Through powering down methodically, you’re following the same disciplined process trusted by careful Dyson owners who want reliable, hygienic results every time they deep clean safely.
Unplug From Outlet
Once the purifier has fully powered down, unplug it directly from the wall outlet and keep the cord clear of the work area while you begin disassembly. Grip the plug body, not the cable, so you don’t strain the cord or loosen internal connections. This step supports safety before unplugging procedures and reduces electrical risk during handling.
Before you move on, complete an outlet access check to confirm the plug is fully removed and the socket area is dry, visible, and unobstructed. Provided the cord crosses your workspace, reposition it immediately to prevent snags, trips, or accidental reconnection. You’re following the same disciplined process experienced Dyson owners use to protect components and maintain safe service conditions.
With power isolated and the cord managed, you’ve prepared the unit correctly for the next cleaning stage.
Wait For Cooling
Before you remove the water tank, filter covers, shrouds, or evaporator, let your Dyson air purifier sit powered off long enough for any recently used internal parts to cool. This cooling safety step protects you from heat exposure and helps prevent stress on plastic clips, seals, and housing during disassembly.
- Place the unplugged unit on a stable, dry surface with clear airflow around it.
- Wait until the housing feels neutral to the touch, especially near vents and the lower assembly.
- Confirm the LCD is dark and no fan noise, warmth, or residual vibration remains before handling parts.
This thermal wait is brief, but it matters. You’re following the same disciplined approach other careful Dyson owners use, and that consistency helps you deep clean confidently, safely, and correctly every time.
Remove the Cover and Filter
Press the shroud release buttons downward to remove the outer covers, then let the inner door spring open so you can access the filter area safely. Keep the unit unplugged and stable on a flat surface during cover removal, and support each panel with both hands to prevent drops or cracked fittings.
Next, release the filter cover clips carefully and lift the filter covers away from the machine without twisting them. Set each cover aside in a clean, dry area where your parts stay organized and protected.
Then pull the filters straight upward, using steady pressure so you don’t damage the housing or disturb nearby components. Work methodically, like the capable Dyson owners’ community does, and keep debris away from the exposed interior. Once removed, place the filters on a protected surface for the next step.
Inspect the Dyson Filter for Wear
Inspect the filter carefully for tears, deformation, moisture damage, or heavy buildup that cleaning won’t correct.
When you find any wear that could reduce airflow or filtration performance, replace the filter before you reassemble the machine. Don’t reinstall a damaged filter, because it can compromise air quality and strain the purifier.
Check Filter Damage
While the filter covers and shrouds are off, check the Dyson filter for wear, tearing, deformation, or heavy buildup that could restrict airflow or reduce purification performance.
Work in good light, handle the filter gently, and inspect every surface so your purifier stays safe, efficient, and ready for your home.
- Look closely for cracked filter edges, warped pleats, and gaps in the seal that could let unfiltered air bypass the media.
- Check for discoloration and tears, especially near seams, corners, and contact points where stress often appears initially.
- Observe packed dust, oily residue, or stubborn debris embedded deep in the pleats, since blockage can raise strain on internal components.
If you see damage, stop cleaning that part aggressively. You’re maintaining your Dyson the right way, with care and attention.
Replace Worn Filter
Should your inspection show torn media, warped pleats, failed seals, or heavy buildup that won’t clear safely, replace the Dyson filter before reassembling the purifier. A compromised filter can restrict airflow, reduce capture efficiency, and let contaminants bypass the seal, so don’t reuse damaged parts.
Install only the correct Dyson-compatible replacement, aligning tabs and seating both halves evenly until they click. Check that covers, shrouds, and adjoining seals sit flush before restoring power. You’ll protect performance and keep your machine operating within its designed safety margins.
Track filter lifespan through the LCD screen or Dyson Link app, and follow recommended replacement intervals rather than waiting for severe loading. Through changing a worn filter promptly, you’re maintaining cleaner air and supporting the standard your Dyson community expects every day, at home.
Wipe the Exterior
Wipe the purifier’s exterior with a dry cloth after you’ve removed the tank, evaporator, filter covers, and shrouds for the deep clean cycle.
Use controlled, even pressure so you don’t force moisture toward seams or electrical areas. Focus on surface fingerprint removal and casing shine maintenance across the loop amplifier, base, and control panel. You’re not polishing for appearance alone—you’re protecting the finish your Dyson community expects to keep in reliable condition.
- Glide the cloth over the loop’s outer curve to lift dust and skin oils.
- Sweep around the base housing, especially where hands grip during handling.
- Finish at the LCD area with light strokes to avoid scratching sensitive surfaces.
If you spot damp residue, dry it immediately. Don’t use sprays, abrasives, or saturated cloths, because they can damage coatings and compromise safe operation.
Clean the Air Intake Vents
Next, clean the air intake vents with a dry cloth once the removable components are off the machine. Keep the purifier switched off and unplugged while you work, so you protect both yourself and the electronics. Wipe along each intake opening with steady pressure to lift vent dust buildup without pushing particles farther inside.
Inspect the intake grille debris closely under good light. When you see compacted lint at the edges, fold the cloth to create a firmer wiping surface and clear it carefully. Don’t use water, sprays, or abrasive tools here, because moisture and scratching can damage sensitive internal parts.
Work methodically around the full intake area until the surfaces look dry, clear, and even. This careful step helps your Dyson community maintain safe airflow, efficient performance, and cleaner operation between scheduled deep cleans.
Clean the Air Outlet Vents
Inspect the air outlet vents with the purifier off and unplugged, then clean them using a dry, soft cloth. Work along the vent openings methodically, lifting surface dust without forcing debris deeper into the assembly. For safe vent dust removal, avoid water, sprays, or abrasive pads that could damage finishes or electrical areas.
- Wipe each outlet blade from edge to edge.
- Use light pressure around the grille perimeter.
- Check for remaining buildup under bright light.
As you perform grille airflow cleaning, keep the cloth folded so you always use a clean section.
Should dust collects in corners, guide it outward with controlled strokes instead of pushing inward.
This careful approach helps your Dyson community of users maintain efficient airflow, cleaner operation, and safer routine maintenance between deeper service tasks.
Vacuum the Filter Housing
After clearing dust from the air outlet vents, vacuum the filter housing with the purifier powered off and unplugged to remove loose debris without disturbing internal parts. Use a soft brush attachment or narrow tool with controlled suction, and keep the nozzle slightly above surfaces rather than pressing into seals or wiring.
Work slowly around the exposed housing perimeter, corners, and intake channels where debris collects. For safe vacuum nozzle access, stabilize the machine on a flat surface and support removable parts away from the opening.
If you see compacted dust, loosen it gently first instead of scraping. These dust removal tips help you clean thoroughly while protecting sensors, gaskets, and clips. You’re maintaining the purifier the right way, like other careful Dyson owners who value performance, cleanliness, and long-term reliability.
Clean the Loop Amplifier
Use a soft, dry microfiber cloth to wipe the loop amplifier from top to bottom, keeping the purifier powered off and unplugged while you clean. Work slowly around the curved edges, using light pressure so you don’t scratch the surface or force dust into vents. For safe loop amplifier polish, never spray cleaner directly onto the machine.
- Fold the cloth into quarters for better control and a clean wiping face.
- Trace the inner and outer rim, lifting fingerprint oils, dust film, and amplifier residue removal buildup.
- Buff any remaining streaks with a fresh dry section until the finish looks even.
If you notice stubborn marks, use a barely damp cloth, then immediately dry the area. You’re maintaining your purifier the right way, and that careful routine keeps your Dyson looking shared-home ready.
Reassemble Your Dyson Air Purifier
After all rinsed parts are fully dry, align the evaporator and water tank correctly, then slide the tank into the machine until it clicks into place.
Secure both filter halves around the purifier and confirm the housing is locked evenly with no gaps or loose panels.
Finally, power the unit on and check for the green tick on the LCD to verify the assembly is correct and safe to operate.
Align Internal Components
With all rinsed parts dry and free of residue, reinsert the evaporator into the water tank, then slide the tank back into the machine until it clicks securely into place. Check component alignment carefully so every contact point meets without force. Proper internal seating prevents leaks, vibration, and startup errors, helping your machine operate safely and consistently.
- Guide the evaporator straight down, keeping it level so its base nests evenly inside the tank.
- Push the tank inward with steady pressure until you hear a firm click and feel resistance stop.
- Inspect the seams and viewing angles to confirm nothing sits proud, twisted, or pinched.
If anything looks uneven, stop and reseat the part before powering on. You’re restoring your purifier the right way, with care, precision, and confidence today.
Secure Filter Housing
Now secure the filter housing by positioning both filter-cover halves around the machine and pressing them together until each side clicks into place. Keep your hands clear of pinch points as you guide the panels inward. Confirm proper housing latch alignment before applying pressure, so you don’t stress the clips or distort the covers.
Work evenly from top to bottom, checking that the seam stays flush around the purifier body. Should one side resist, stop and reseat the cover rather than forcing it. You’ll protect the locking tabs and maintain an airtight fit.
Once both halves meet cleanly, press at the designated edges to secure cover fasteners fully. This step helps your purifier go back together the right way, giving you confidence that your maintenance matches Dyson’s intended assembly standards.
Test Final Assembly
Carefully test the final assembly before you return the purifier to regular use.
Confirm every reinstalled part seats correctly, and don’t power the unit until you complete a full component alignment review. Your careful work keeps the purifier safe, quiet, and ready to support your shared home environment.
- Check that the water tank slides fully inward and clicks; perform a secure fit check on both side releases.
- Inspect the evaporator, cap clips, filter covers, and shrouds for flush edges, locked tabs, and no visible gaps.
- Power on the purifier and verify the LCD shows the green tick, with no alerts, rattles, leaks, or resistance.
If anything looks uneven, switch the machine off and reseat the part immediately. Never force misaligned components during reassembly or operation.
Reset the Filter Light
Check the LCD screen after reassembly to confirm the purifier has accepted the cleaned components and the maintenance status has cleared. Should the filter light remains on, perform a filter light reset using the remote or onboard controls specified for your Dyson model. Hold the reset command until the indicator maintenance reminder disappears and the display returns to normal operation. Don’t unplug the unit during confirmation.
| Check | Action | Safe result |
|---|---|---|
| LCD alert | Hold reset | Reminder clears |
| Green tick | Verify fit | Parts seated |
| Normal display | Resume use | Operation stable |
Should the alert persists, recheck filter covers, shrouds, and tank engagement. You’re part of a careful group of owners who protect performance by verifying every status signal before regular use each time.
Set a Deep Cleaning Schedule
Ideally, you’ll run the Dyson deep clean cycle once each month to remove bacteria and limescale before buildup affects humidification performance. Create a maintenance calendar so your purifier stays reliable, hygienic, and ready for your shared home space.
Use the LCD alert or Dyson Link app notification as your monthly reminder, then schedule the cycle as soon as you can monitor the machine for the full hour.
- Mark the initial weekend of each month for the deep clean cycle.
- Confirm you have 150 grams of citric acid, cold water, and a dry cloth ready.
- Stay nearby while the one-hour countdown runs; don’t unplug or power off the unit.
This routine helps you catch service needs at an early stage, supports safe operation, and keeps your Dyson performing to the standard your household expects every month.
Avoid These Cleaning Mistakes
Although the deep clean cycle is straightforward, a few common mistakes can damage components or leave residue in the water system. You’ll protect your Dyson by following exact steps and avoiding shortcuts. Prioritize proper solution mixing: add 150 grams of citric acid only after filling the tank halfway with cold water, then dissolve it fully before returning the evaporator. Don’t use warm water, overfill prematurely, or leave crystals behind. Never switch off or unplug the machine during the one-hour cycle.
| Mistake | Risk | Safer move |
|---|---|---|
| Warm water | Warping, residue | Use cold water |
| Premature overfilling | Poor dissolving | Fill halfway first |
These are the key mistakes to avoid whenever you want reliable performance and a cleaner, safer shared home environment every month.
Frequently Asked Questions
When Should I Run the Dyson Deep Clean Cycle?
Run the cycle once a month to keep internal parts clean. Also run it as soon as the LCD screen or Dyson Link app tells you to. Keeping up with the cycle helps maintain safe operation and steady performance.
How Much Citric Acid Is Needed for Deep Cleaning?
Use 150 grams of citric acid. For an exact dosage, dissolve it in a tank filled halfway with cold water, then top up the tank to finish the descaling solution. This amount matches your group’s approved maintenance requirement.
How Long Does the Dyson Deep Clean Cycle Take?
The Dyson deep clean cycle takes one hour. The LCD screen shows a countdown so you can track the remaining time. To keep the cleaning cycle consistent, leave the machine plugged in and switched on until it finishes.
Can I Unplug the Purifier During the Deep Clean Cycle?
No. Do not unplug it during the deep clean cycle. A power interruption can stop descaling before it finishes and may cause errors. Keep it powered for the full hour unless you want to cancel the cycle by pressing and holding the deep clean button for five seconds.
What Does the Green Tick on the LCD Screen Mean?
A green tick on the LCD screen shows that the components have been reinstalled correctly and the unit has confirmed they are secure. In the display indicator guide, this filter status means the system is properly assembled and ready for normal operation.