Using a Dyson Hot+Cool air purifier is pretty simple. Start by checking that the filters are fitted properly and the machine is fully locked in place. Then use the remote or app to choose heating, cooling, Auto mode, airflow, or oscillation to suit the room. The screen shows live updates, and a few small settings and care tips can help it run at its best.
Set Up Your Dyson Hot+Cool
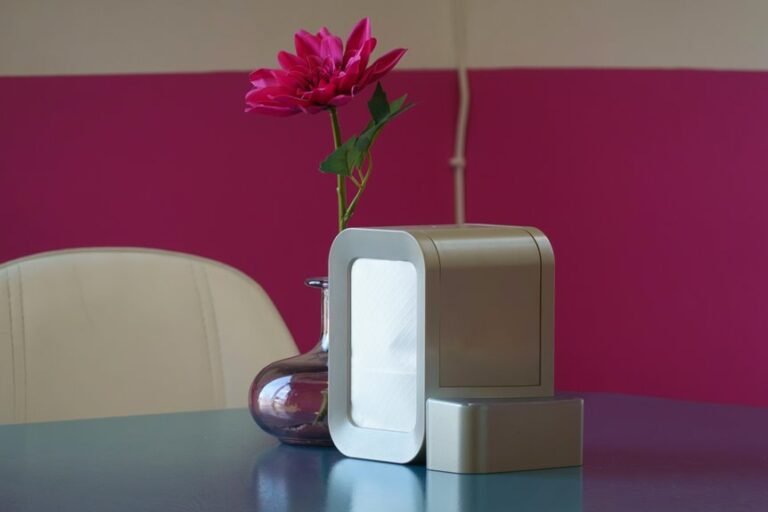
To set up your Dyson Hot+Cool Air Purifier, lift the machine out of the box via its base and remove all protective packaging. During unboxing setup, press the side buttons to release the outer covers, then remove them carefully. Fit the HEPA+Carbon filters into their slots, matching your model’s filter configuration. Reattach the covers and confirm each side clicks firmly into place.
Next, check the serial number on the base so you’re ready for guarantee registration later. For initial placement, position the machine upright on a stable, flat surface near a power outlet, leaving clear space for airflow. You’re setting it up the right way, just like other Dyson owners do. Plug it in, press the power button, and verify the screen illuminates. Adjust tilt for airflow direction.
Learn the Remote and Display Controls
Next, you’ll identify each remote button so you can control airflow speed, oscillation, heating, cooling, and airflow direction correctly.
You’ll also read the LCD display to verify air quality, temperature, humidity, and filter-life status in real time.
When the machine doesn’t respond as expected, these controls let you check settings quickly and adjust operation with precision.
Remote Button Functions
Once the purifier is on, use the remote to control the main operating functions directly. Start with a button placement overview so you can identify speed, oscillation, heating, cooling, and airflow direction without hesitation. In case the remote isn’t responding, confirm remote pairing basics and check that you’ve aimed it toward the machine.
Press the airflow speed button to move through up to 10 power levels. Use oscillation to set air circulation from 0° to 350°, depending on room coverage. Press the red heating button to raise or hold for your target temperature. Press the blue cooling button to exit heating and deliver purified airflow. Use the airflow direction button to switch between front projection and rear diffused airflow. Keep the remote magnetically stored on the machine whenever you’re done.
Display Screen Indicators
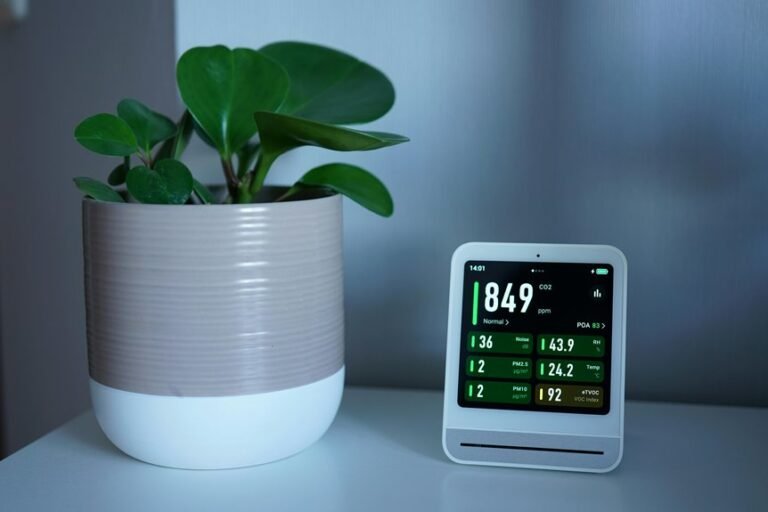
After you’ve used the remote to change settings, check the LCD screen to verify what the purifier is detecting and how it’s responding. Read the LCD status indicators in sequence: airflow speed, oscillation angle, target temperature, current room temperature, humidity, and filter life. This gives you a quick diagnostic snapshot.
To interpret screen icon meanings correctly, watch for pollutant graphics and trend bars. In Auto mode, the display updates in real time and can report air quality over the last 12 seconds or 24 hours.
Whether heating stops, confirm whether the target temperature has been reached rather than assuming a fault. Whether airflow shifts, verify whether you’ve selected front or back projection.
As you learn these LCD status indicators, you’ll operate the machine with more confidence and consistency every day.
Switch Between Heat, Cool, and Auto
Three core modes control how the Dyson Hot+Cool Air Purifier responds to your room: Heat, Cool, and Auto. In this mode switching overview, you’ll use the remote to select the operating state that matches current conditions. Press the red heating control to enter Heat. Press the blue cooling control to exit heating and move into Cool. Select Auto whenever you want the unit to monitor air quality and room temperature continuously using its heating cooling auto logic.
To verify the change, check the LCD immediately after each command. Auto mode makes the machine decide whether to purify, heat, or cool, then pauses heating once the room reaches its set temperature. Whenever the machine doesn’t respond as expected, confirm it’s powered on, the remote battery works, and no command delay occurs from distance or obstructions.
Adjust Temperature, Fan Speed, and Oscillation
You’ll set the target temperature with the heating controls, then verify the change on the LCD screen.
Next, adjust airflow speed with the remote to match the room’s comfort requirement and circulation load.
Finally, set oscillation from a fixed position up to wide-angle swing so the purifier distributes air where you need it.
Set Temperature Levels
Set the target temperature with the red heating button on the remote, then press and hold it to raise or lower the room temperature setting with more precision. Use this method when you need accurate temperature presets within the machine’s heat setting range. If the display responds but the room doesn’t warm, confirm you’re in heating mode, not cooling, and check that the purifier isn’t paused after reaching target temperature.
For consistent results, place the unit in a sealed room and keep it on a flat surface. You’ll get more stable readings when doors and windows stay closed. If temperature changes seem delayed, let the sensors recalculate ambient conditions before adjusting again. In Auto mode, your Dyson will stop heating once it reaches the selected level, helping your space feel comfortable, controlled, and shared by everyone nearby.
Control Speed And Swing
Adjust airflow and swing directly from the remote to fine-tune comfort and air circulation. Press the airflow speed button to raise or lower output through 10 levels. Should the room feel stagnant, increase airflow speed incrementally and monitor comfort. For quieter operation or nighttime use, reduce speed until circulation remains effective without excess noise. Should you’re switching between heating and cooling, confirm the selected mode beforehand so fan response matches your target conditions.
Use the oscillation button to set the oscillation range from 0° to 350°. Begin with a narrow sweep for personal airflow, then widen it to distribute purified air across shared spaces. Should coverage seem uneven, reposition the unit on a flat surface and retest. You’ll get more consistent circulation as swing settings match room size and seating position.
Use Night Mode and Sleep Timer
Typically, Night mode reduces operating noise and dims the display so the purifier can run with less disruption while you sleep. To enable it, press the Night mode button on the remote, then confirm the icon appears on the LCD. These night mode benefits help you keep purification active without bright light or higher fan distraction.
For sleep timer setup, press the timer button and cycle through the available shutdown intervals until you reach your preferred duration. You can use this procedure when you want the machine to stop automatically after you fall asleep.
If airflow still feels too strong, lower the speed first, then recheck Night mode status. By combining reduced noise, dimmed display output, and automatic shutoff, you create a more consistent overnight routine with your Dyson and your home environment.
Connect Dyson Hot+Cool to the App
To connect your Dyson Hot+Cool to the app, download the myDyson or Dyson Link app on your phone, then open the menu and tap Add machine. Make sure your purifier is powered on and nearby. These app pairing steps work best if your phone meets Wi Fi connection requirements, including iOS 10+ or Android 5+.
- Press the Standby button on the machine to start pairing mode.
- Follow the app prompts to connect through Bluetooth and your Wi-Fi network.
- Enter the serial number from the machine base to register your unit correctly.
- Confirm connection, then test remote controls and notification settings.
If pairing fails, move closer to the machine, verify your network, and retry.
Once connected, you’re part of the Dyson user community with easier machine management.
Check Air Quality on the LCD and App
When you turn the Dyson Hot+Cool air purifier on, the LCD gives you an immediate diagnostic view of room conditions. You’ll see pollutant icons, temperature, humidity, and status indicators update in real time. In Auto mode, review the display to confirm how the machine interprets current conditions and adjusts operation accordingly. Use the onboard controls or remote to cycle through available data screens for more precise air quality readings.
In the myDyson or Dyson Link app, open your machine dashboard to compare live values with historical trends, including the last 12 seconds or 24 hours. This helps you identify recurring spikes and verify whether sealed-room use improves results. Enable app alerts so you stay informed when conditions change, even when you’re away.
That keeps you connected and confidently in control.
Clean the Filter and Reset the Filter Light
To service the filter, you’ll initially power off and unplug the Dyson, then remove the outer covers and take out the HEPA+Carbon filter components.
You should inspect and clean the filter area correctly, following Dyson’s handling guidance to avoid damage or airflow restriction.
After reinstalling the filters and covers, you’ll reset the filter light by holding the Night mode button for 5 seconds.
Filter Removal Steps
A safe filter removal starts with shutting the Dyson Hot+Cool Air Purifier off and unplugging it. This protects you and lets the system fully stop before filter access. Work on a stable surface, and keep your parts organized so you stay confident through each step.
- Press the side buttons to begin cover removal, then lift off both outer covers carefully.
- Identify the HEPA+Carbon filter position. Depending on your model, you’ll see combined or separate filter sections.
- Grip the filter tabs and pull straight upward without twisting. In case resistance occurs, recheck alignment and seating points firstly.
- After reinstalling or replacing filters, secure the covers until they click, then restore power and hold the Night mode button for 5 seconds to reset the filter light properly.
Proper Filter Cleaning
Generally, you won’t wash or vacuum the Dyson Hot+Cool Air Purifier’s HEPA+Carbon filter, because that can damage the filter media and reduce capture performance. Follow these filter washing warnings exactly: don’t rinse, scrub, tap out dust, or use compressed air. Instead, inspect the removed filter for saturation, discoloration, odor retention, or visible debris that signals end-of-life rather than cleanability.
For proper upkeep, focus on the purifier’s exterior and filter housing. With the machine unplugged, wipe the shrouds and inner cavity using a dry, lint-free cloth. Confirm the filter seats evenly and the covers lock fully when reinstalled. Your filter cleaning frequency should match Dyson guidance and your room conditions, especially as you run the unit daily. That keeps your setup reliable and your community of users aligned.
Reset Filter Light
When the filter indicator stays on after you’ve replaced the HEPA+Carbon filter, reset the filter life counter so the machine can recalculate remaining capacity accurately. This step confirms proper installation and clears common filter warning reasons, including incomplete cover seating or skipped filter reset timing after maintenance. Follow this check sequence so your Dyson performs like the rest of us expect.
- Turn the purifier on and confirm the display still shows the filter alert.
- Press and hold the Night mode button on the remote for 5 seconds.
- Watch the screen for the reset confirmation, then release the button.
- Recheck filter life on the LCD and verify airflow returns to normal status.
If the light remains on, reseat both covers, inspect filter alignment, and repeat the reset once more carefully.
Fix Common Dyson Hot+Cool Problems
If your Dyson Hot+Cool Air Purifier isn’t working as expected, start with checking the basics that most often interrupt normal operation. For power issues, confirm the plug is fully seated, the outlet works, and the machine sits stable on a flat surface.
During startup troubleshooting, press the front power button first, then test the remote and verify its battery orientation.
If the screen stays dark, unplug the unit, wait 10 seconds, and reconnect it. Check that both outer covers are locked and filters are installed correctly, because misalignment can stop operation.
If airflow seems weak, raise fan speed, confirm oscillation settings, and remove nearby obstructions.
For app control failures, restart Bluetooth or Wi-Fi pairing through the standby button. You’re following the same careful process Dyson users rely on daily.
Save Energy While Using Dyson Hot+Cool
Once your Dyson Hot+Cool runs correctly, focus on settings that reduce power draw without sacrificing comfort. You’ll get better efficiency after you diagnose room conditions initially, then match airflow, oscillation, and heating output to actual demand. Use Auto mode so the unit modulates operation instead of running continuously. Keep doors and windows closed to stabilize temperature and air quality. Proper energy saving placement also matters: position the machine on a flat surface away from drafts and direct heat sources.
- Set the lowest airflow speed that maintains comfort.
- Use diffused rear airflow in winter to prevent overheating.
- Monitor LCD or app data to confirm shorter heating cycles.
- Build eco friendly usage habits by switching off once the room is empty.
These steps help your space feel comfortable, efficient, and well-managed every day.
Frequently Asked Questions
Can I Use Dyson Hot+Cool With Windows Open?
Yes, you can use a Dyson Hot+Cool with windows open, but outside air can reduce how effectively it heats, cools, or purifies the room. Open windows also allow dust, pollen, and other pollutants to enter. For stronger performance, use it in a closed room. With windows open, heating and cooling may feel less consistent, and purification can take longer.
Where Is the Serial Number for Warranty Registration?
Find the serial number on the bottom base of the machine. Write it down, then enter it in the Dyson app or on the Dyson website to complete warranty registration.
Does the Remote Attach Magnetically to the Machine?
Yes. The machine has a magnetic storage spot that holds the remote in place. If it does not attach securely, center the remote on the magnetic area and remove any dust or debris from the contact points.
What Phone Versions Support the Dyson App?
The Dyson app works with iOS 10 or later and Android 5 or later. Check that your phone meets these version requirements before pairing to help ensure a smooth setup.
How Should I Dispose of Used Dyson Filters?
Turn off and unplug your Dyson machine, then remove the used filters carefully. Check your local recycling or household waste guidelines to see how filters should be disposed of in your area. This helps you handle waste correctly and follow local requirements.