To clean a NuWave air purifier filter, start by checking which filter layer is washable. The pre-filter can usually be rinsed or vacuumed, while the inner HEPA and carbon filters should stay dry. Open the unit carefully, remove the filters in order, and clean only the parts meant for washing. A quick check and gentle cleaning help your purifier keep running smoothly.
Check Your NuWave Filter Type
Before you clean anything, check which NuWave filter set your unit uses and how each filter is positioned in the housing. You’ll work faster and avoid reinstall errors after you confirm the numbered slots, airflow direction, and any R or L markings before removal.
Start with unplugging the unit, setting the louvers to 90°, and opening the rear filter cover with the handle. Read slot assignments carefully so you can verify filter material types without guessing.
Slot 1 typically holds the stainless steel layer, while slot 2 holds the Bio-Guard layer; other slots vary by model. When a filter is new, confirm whether protective plastic remains installed. This inspection also helps you judge filter replacement timing, because wear, odor, and buildup patterns tell you whether your NuWave system is performing normally.
Identify Washable and Non-Washable Filters
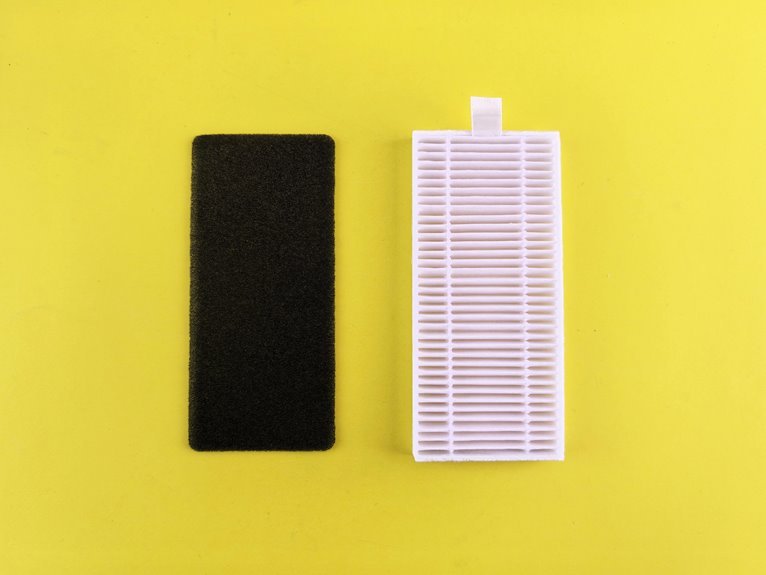
Once you’ve confirmed the slot numbers and filter positions, separate the filters into washable and non-washable types so you don’t damage the media during cleaning. Start with washable filter identification by checking construction. The stainless steel filter in slot 1 is washable because its rigid metal mesh tolerates water and detergent. The Bio-Guard filter is also washable when your model documentation supports rinsing and full drying.
Use filter material differences to classify the remaining layers. If a filter has paper-like pleats, activated carbon filling, or bonded composite media, treat it as non-washable. These materials can swell, disintegrate, or lose filtration efficiency when wet.
As you sort each piece, keep right and left markings aligned. That disciplined approach helps you clean like an informed NuWave owner and protects every stage properly.
Get the Right Cleaning Supplies
The right cleaning supplies keep the process controlled and prevent damage to the NuWave air purifier’s filters and housing. Before you begin, build a cleaning supply checklist so every step stays efficient and consistent. Gather a vacuum with a soft brush attachment, several lint-free cloths, cotton swabs, a dust mask, warm water, mild dish soap, and a spray bottle with mild detergent or degreaser.
These essential cleaning tools let you match the material to the cleaning method. Use the vacuum and brush for dry debris on intakes, housing surfaces, and the stainless steel pre-filter. Reserve cloths and swabs for controlled wiping in tight areas. Keep a separate drying area ready with clean towels or a rack.
As your supplies are organized, you clean with confidence and consistency together.
Turn Off and Open the Purifier
Start to setting the front louvers to a 90° position so you can access and wipe them safely with a dampened cloth. This open louver access gives you clear visibility and prevents strain while you prepare the unit for service. Whether dust is present, wear a mask so you can work comfortably and confidently.
Next, power the purifier off and disconnect it from the outlet for full unplug safety. Confirm the display is dark and the fan has stopped completely before you continue.
Move to the back panel, locate the filter cover handle, and pull it steadily to open the purifier. Don’t force the cover; whether it resists, check alignment and grip again.
You’re now ready for the next cleaning step, with the housing accessible and your workflow matching best practice.
Clean the NuWave Pre-Filter
Before you clean the pre-filter, slide the filters out of the housing carefully so you don’t shake loose dust back into the room.
Start with slot 1, the stainless steel pre-filter. Inspect both sides for pre filter dust buildup, oily residue, or matted debris that can restrict airflow and reduce capture efficiency.
Use a vacuum with a brush attachment and clean the pre-filter methodically, moving up and down, then side to side. Unless debris remains bonded to the mesh, wash it with warm, soapy water and rinse off all residue.
While the filter is out, perform intake grille maintenance by vacuuming both side intakes and wiping the inside and outside of the housing.
Should you don’t have a brush tool, use a clean cloth to lift dust without forcing it deeper.
Let the Filter Dry Completely
After washing the Bio-Guard or stainless steel filter, drain off excess water and place each filter in a clean, well-ventilated area until it’s fully dry. Keep filters flat or upright on a lint-free surface, away from direct heat, sunlight, or enclosed spaces that trap humidity and compromise performance.
You should allow 12 to 24 hours for complete drying, depending on room airflow and filter thickness. This step supports drying time importance because trapped moisture can weaken filtration efficiency and create odor, residue, or microbial growth.
For moisture damage prevention, inspect the frame, mesh, and inner layers before moving forward. Should you see dark damp spots, feel coolness, or detect any musty smell, the filter isn’t ready. Taking this pause helps you care for your unit like experienced NuWave owners do, every time.
Reinstall the Filter and Keep It Clean Longer
Once each filter is fully dry, reinstall them in their numbered slots and match the R and L markings exactly as labeled. Start with filter 1, then continue in order until each panel seats flat inside the housing. Reattach the rear cover securely, restore power, and reset indicator lights as needed by holding Timer or Turbo for two seconds.
To keep performance stable, inspect fitment, airflow, and indicator behavior after startup. Should a filter shifts, remove and reseat it before operation. Avoid damp filter storage, because trapped moisture can trigger odor, residue, or premature wear.
You’ll get more consistent results through vacuuming the pre-filter every two months and following a maintenance schedule for deeper cleaning. That routine keeps your purifier reliable and helps everyone in your space breathe easier together daily.
Frequently Asked Questions
How Do I Reset the Filter Light After Cleaning?
To reset the filter light after cleaning, turn the unit on. Press and hold Timer for 2 seconds to reset filter 2. Press and hold Turbo for 2 seconds to reset filter 4.
Should I Clean the Air Quality Sensor Too?
Yes. Dust buildup causes many incorrect readings, so the air quality sensor needs cleaning as well. For proper sensor care, use a lightly damp swab, then dry it fully. When following calibration guidance, make sure the sensor is completely dry first.
How Often Should I Clean the Pre-Filter?
Clean the pre-filter at least once every two months as part of regular maintenance. If airflow drops, dust builds up, or odors appear sooner, clean it more often to keep the unit working properly with the group.
Can I Wash the Stainless Steel Filter With Soap?
Yes. Wash the stainless steel filter with warm, soapy water. Rinse off all soap, then let it air dry completely for 12 to 24 hours before reinstalling it.
What Do the R and L Filter Markings Mean?
R and L markings show which filter goes on the right side and which goes on the left. Use these markings when reinstalling the filters to place each one in the correct side and numbered slot. If a filter goes into the wrong position, it may not seat properly and can affect airflow.