
Reading a Dyson air purifier is pretty simple once you know what the screen shows. The display gives you a quick snapshot of your air quality, room conditions, and filter status. A few taps let you see details like dust, gases, temperature, and humidity. This guide shows what each reading means and how to tell what’s affecting airflow in your room.
Read the Dyson Purifier Display
To read the Dyson purifier display, press the information menu button on the remote to cycle through the monitored data on the LCD screen. You’ll move through temperature, humidity, particulate readings, and remaining filter life in a fixed display sequence. Keep the remote pointed clearly, then confirm each metric before advancing.
You’re part of the Dyson user community upon you interpret the screen methodically. Check the numeric readouts, observe any pollutant symbols, and verify whether Auto mode is responding to current conditions.
Whenever you’re operating in Night mode, reduced screen brightness can affect visibility, so adjust your viewing angle before diagnosing status. Use the LCD as your primary diagnostic interface, and review each screen in order so you don’t miss a maintenance indicator or environmental change during operation.
Understand Dyson Air Quality Colors
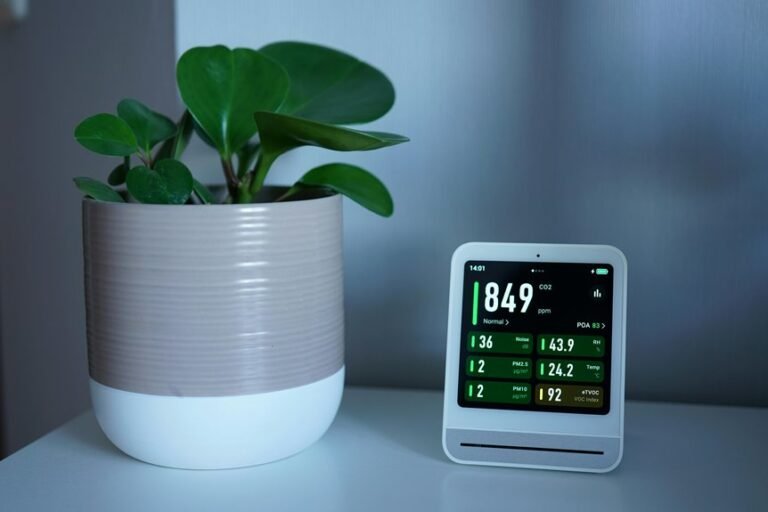
As the Dyson display shifts color, it’s giving you a fast visual status of current air quality, so check that band before interpreting the detailed readings. Treat it as your initial-pass diagnostic. On most units, green signals cleaner conditions, yellow shows moderate contamination, orange marks degraded performance, and red flags poor air status requiring attention. This color indicator guide helps you classify room conditions instantly.
Use the band with the machine’s air quality scale to judge severity trends, not just isolated moments. If the color stabilizes or improves in Auto mode, your purifier’s responding correctly. Should it stay in a degraded range, verify placement, airflow path, and filter fitment. You’re not guessing—you’re reading the same visual system Dyson users rely on for quick, shared interpretation every day.
Read PM2.5 and PM10 Levels
After checking the color band, use the information menu button on the remote to cycle to particulate readings and isolate the actual pollutant load. Watch the LCD for PM2.5 and PM10 values, which report airborne particle concentrations per size class. PM2.5 captures finer combustion smoke, dust, and aerosols; PM10 tracks larger pollen, mold fragments, and coarse debris.
Use this particle size comparison to diagnose what’s circulating in your shared air environment. Higher PM2.5 usually signals deeper filtration demand, while increased PM10 often points to visible dust or seasonal triggers. For a quick health impact overview, treat rising numbers as confirmation that your purifier should remain in Auto mode or run at higher airflow. Once readings drop, you’ll know your Dyson is stabilizing indoor air and helping your space feel cleaner together.
Read VOC and NO2 Readings
You’ll use the information menu to isolate the VOC and NO2 metrics on the LCD. Check the VOC reading first to gauge volatile gas load, then read NO2 to identify nitrogen dioxide spikes linked to combustion sources.
If either value trends high, you can verify the pollutant type and adjust your diagnostic response accordingly.
Understanding VOC Levels
How do you read VOC and NO2 on a Dyson air purifier? Use the information menu and watch the VOC indicator when air quality shifts. VOCs are gaseous chemicals from cleaners, paints, cooking fumes, or cosmetics. When the purifier detects them, the display rises and Auto mode increases airflow. You’ll belong with informed users by treating VOC data as a diagnostic signal, not a guess.
For accurate voc source tracking, compare spikes with activities in your space. Should readings rise after spraying products or opening stored solvents, you’ve identified likely contributors. For stronger indoor voc control, ventilate, remove the source, and let Auto mode stabilize conditions. Recheck the display after changes. Should VOC levels stay elevated without an obvious trigger, inspect concealed sources like new furniture, adhesives, or recently cleaned fabrics nearby.
Interpreting NO2 Readings
When NO2 appears on your Dyson purifier, use the information menu to confirm the pollutant reading and watch for changes alongside overall air quality indicators. If the value rises quickly, correlate it with traffic exposure, gas appliances, or outdoor pollution spikes. In Auto mode, your unit should increase airflow as nitrogen dioxide concentrations climb.
Check whether the reading falls after ventilation changes or source removal. Stable high NO2 suggests persistent combustion contamination, not a transient event. If values seem inconsistent, allow time for NO2 sensor calibration after startup or relocation.
Keep the purifier on a flat surface, away from direct drafts, so the sensor samples room air accurately. You’ll read the display more confidently when you compare NO2 behavior with VOC trends, temperature, and humidity like experienced Dyson users do daily.
Check Temperature and Humidity
Press the information menu button until you reach the temperature display, then verify the current room reading on the LCD.
Next, check the humidity percentage to assess moisture conditions and identify whether the environment is within a normal operating range.
Use both values as diagnostic inputs so you can interpret the purifier’s air readings with better accuracy.
Reading Temperature Display
To check temperature and humidity, use the information menu button on the remote and scroll through the LCD readouts until those values appear. You’ll use temperature gauge basics to verify the room reading quickly. The display temperature format is straightforward, so your Dyson community routine stays consistent and accurate during daily checks.
- Press the information menu button repeatedly until the temperature screen appears.
- Read the numeric value on the LCD and confirm whether your unit shows Celsius or Fahrenheit.
- Compare the reading with your room conditions to diagnose placement issues or airflow interference.
If the temperature seems off, move the purifier away from radiators, windows, or direct sunlight. Keep it on a flat surface for stable sensor performance. With these checks, you’ll read temperature data confidently and keep your setup aligned.
Understanding Humidity Levels
Clarity matters whenever you check humidity on your Dyson air purifier, because the reading helps you assess room comfort and sensor response. Press the information menu button until the humidity percentage appears on the LCD. You’re verifying whether the room sits within a practical humidity comfort range, not guessing from feel alone.
Use the value as a diagnostic checkpoint. If humidity trends low, air may feel dry and static may increase. If it trends high, the room can feel heavy. Your goal is stable indoor moisture balance that supports comfort and confirms the purifier’s sensors are reporting consistently. Check readings at the same time daily for a cleaner baseline. If the percentage shifts sharply after cooking, showering, or opening windows, that’s normal. You’re reading the environment like a confident Dyson user.
Interpreting Air Readings
Temperature and humidity readings work best whenever you read them together, since they give you a quick diagnostic view of room conditions and purifier response. As you scroll the information menu, compare both values instead of checking either in isolation. You’ll spot whether your machine is reacting to heat buildup, moisture load, or stale airflow patterns.
- Check temperature first; sudden rises can signal poor circulation or direct sun exposure.
- Check humidity next; high percentages often correlate with heavier air and slower comfort recovery.
- Cross-check both against pollutant history to see whether spikes align with cooking, showers, or occupancy.
If readings seem off, verify placement on a flat surface and allow sensor calibration time. In your shared air-care routine, these diagnostics help you interpret performance accurately and respond faster together.
Use Dyson Fan Speed Settings
Usually, you’ll adjust Dyson fan speed with the airflow speed toggle on the remote, located in the middle left position. Use it to increase or decrease fan speed control in stepped increments. Each adjustment changes output immediately, so you can verify airflow performance through sensing stronger projection and hearing the motor response.
When you’re checking purifier behavior, match speed to room demand and your comfort threshold. Higher settings accelerate circulation and contaminant capture, while lower settings reduce noise and draft intensity. Should the machine seems underresponsive, confirm the remote is seated correctly, facing down on top, then retry the toggle.
You’re part of a group that values precise operation, so use deliberate changes and observe machine response after each press. That method helps you diagnose settings quickly and confidently.
Understand Auto Mode and Air-Quality Graphs
After setting fan speed manually, switch to Auto mode to let the purifier regulate output from live sensor readings. You’ll see the unit join your routine, sampling pollutants and modulating airflow without constant input. This is where auto mode responsiveness matters: faster ramp-up signals higher detected contamination, while steadier output suggests stable indoor conditions.
- Press the information button to cycle pollutant, temperature, and humidity displays.
- Watch air quality graph trends for spikes, drops, and recovery speed after cooking or opening windows.
- Compare graph movement with fan changes to verify sensor-driven operation, not guesswork.
Should the graph climbs, your purifier is detecting a higher load. Should the graph falls, filtration is working. You’re not just reading numbers—you’re learning how your Dyson interprets your shared air environment daily.
Know What Dyson Filter Alerts Mean
Whenever a filter alert appears, your Dyson is reporting reduced HEPA+Carbon service life rather than a sudden fault. You’re seeing a maintenance status, so verify remaining filter life in the information menu, then schedule filter replacement before airflow efficiency drops further.
| Display cue | Diagnostic meaning | Your action |
|---|---|---|
| Filter life low | HEPA+Carbon capacity is nearing end-of-life | Order replacement filter |
| Filter expired | Filtration performance is below spec | Install new filter immediately |
| Alert persists | Counter wasn’t cleared after service | Perform alert reset |
Before service, switch off and unplug the unit. Fit the new filters until they click into place on the base. Then complete the alert reset using your model’s button sequence. You’re maintaining performance like a confident Dyson owner, part of the informed user community.
Understand Dyson Purifier Warning Symbols
You’ll see common warning icons on the LCD when the purifier detects a status fault or degraded air conditions.
Read each symbol as a diagnostic code: some indicate pollutant detection, while others flag filter life, maintenance needs, or operational issues.
Once you identify what the symbol means, you can verify the cause and apply the correct corrective action fast.
Common Warning Icons
Warning icons give you a fast diagnostic readout on a Dyson purifier’s status. You’ll use these visual cues to confirm system health, monitor filter replacement alerts, and respond to maintenance alert indicators before performance drops. Staying familiar with the display helps you feel in control and aligned with best-use habits.
- Filter icon: Check it whenever filter life runs low on the LCD. It flags service timing, not airflow failure.
- Air quality alert: Watch for pollutant symbols during Auto mode. They confirm the sensors have detected degraded indoor conditions.
- General attention icon: Treat it as a prompt to inspect power, placement, and operating mode before deeper troubleshooting.
Scan the screen regularly, especially after startup, mode changes, or long run cycles. That routine keeps your purifier operating predictably.
What Symbols Mean
How do the symbols on your Dyson purifier translate into action? Use the display as a diagnostic panel, not decoration. Your symbol legend overview starts with pollutant icons: when they appear, air quality has dropped and the machine is responding. In Auto mode, you’ll see purification increase without extra input. Temperature and humidity symbols report ambient conditions, helping you verify the unit’s environmental readout quickly.
Your icon function guide should also track filter life and operating status. A low filter indicator means you’re nearing replacement time for the HEPA+Carbon filter. After replacement, reset filter life using the remote button sequence.
Night mode symbols confirm dimmed display and reduced acoustics. Oscillation and airflow icons show directional and speed settings. Once you know these symbols, you’re reading your Dyson like the community pros do.
Fix Inaccurate Dyson Purifier Readings
Should your Dyson purifier shows readings that don’t match the room conditions, start with the basics: confirm the machine sits on a flat surface, has power, and runs in Auto mode so it can assess air quality in real time.
Then work through this diagnostic sequence as a capable Dyson user:
- Remove any protective packaging, inspect the air inlets, and make sure the HEPA+Carbon filters are seated and the outer covers lock securely.
- Run a display reset after filter changes, then verify filter life isn’t expired. Needed, perform sensor calibration by letting Auto mode sample undisturbed air.
- Relocate the unit away from drafts, vents, kitchens, or humidifiers that can skew particulate, temperature, and humidity detection.
Should readings still drift, power cycle the purifier and recheck with your remote information menu.
Frequently Asked Questions
How Do I Assemble the Dyson Air Purifier Before First Use?
To assemble your Dyson Air Purifier for first use, remove all packaging materials, take off the filter covers, insert the HEPA and Carbon filters into place, and refit the covers until they are secure. Set the purifier on a flat, stable surface close to a power outlet so it is ready to use.
Where Should I Place the Remote Control When Not in Use?
Store the remote on top of the machine with the buttons facing down so it attaches magnetically. This keeps the remote secure, easy to find, and positioned as intended.
How Do I Turn on Oscillation From the Remote?
Press and hold the oscillation button on your remote until the fan starts moving side to side. If the fan does not respond, check that the remote is paired correctly. Use the other direction controls to adjust airflow for your space.
How Do I Activate Night Mode on the Purifier?
Press the Night mode button at the bottom right of your remote. The display dims and operation becomes quieter right away. Check that the Night mode icon is visible, then change the airflow if needed.
How Often Should Dyson Hepa+Carbon Filters Be Replaced?
Replace Dyson HEPA+Carbon filters every 12 months. Use the LCD screen to check remaining filter life and confirm when a replacement is due. If airflow weakens or pollutants are not being removed effectively, install a new filter.